Showing posts with label paint project. Show all posts

6/26/16

Giving a New Fun Look to a Couple of Old Chaises ~ Painted Outdoor Cushion Project


Ahhh it's SUMMERTIME and the living is EASY!!! Well maybe it is if you are a couple of kids enjoying the fun of splashing around all day in the swimming pool. That's pretty much what Michael and Grace have been up to since school has let out. And when they are done with the pool they have always taken their respective towels to our front driveway and spread them out there to sun themselves.


I've always found that to be a rather uncomfortable way to sunbathe, so recently I did a little internet searching to see if there was a way of sprucing up a couple of old wrought iron chaises and their cushions we happen to have in the garage. I wanted to do something practical but fun...you know with bright summertime colors.


I found a spray paint specifically made for painting fabric, but I felt that the price was way too costly for the old beat up and faded cushions we already had. So I stuck with a common tutorial which seemed to work for the people who tried it.


The one I decided to go with involved just a few products. First I purchased a quart of exterior paint in a flat finish. The color I chose was Rainwater by Behr paint. Next I purchased a fabric medium by Martha Stewart over at Michael's craft and supply store. The last few items I needed were a paint brush, which I already had, along with some good old tap water and a clean sponge.


The technique is pretty easy with no exact science to it. 
Just mix roughly two parts paint to one part fabric medium along with an equal amount of water. I made sure my cushions were clean by running them through the washer and dryer before starting. Next use your clean sponge (I stress clean because you don't want any little pieces of "ick" stuck to a dirty sponge falling off onto your cushions) to dampen the cushion before you begin to paint. It took about three good coats for complete coverage. I brushed the paint on thinly and then let it dry thoroughly before adding the next coat. (Hint: make sure to do this on a dry sunny day, this will help to reduce drying the time between coats and move the entire project along much faster.)
The below pic is my cushion after 2 coats.


Once the cushions are painted they do have a bit of a "plasticy" feel to them. A few tutorials suggested sanding them down between coats, but for me that "plastic" feel was just fine. I liked that they will now repel water, can be rinsed off to clean, and hopefully not fade out as easily in the intense summer sun. (I'll have to post an update at the end of August)

I also went ahead and spray painted both chaises white. I thought this would be a much prettier contrast to the new bright blue color of the cushions.


The little brown table between the two chaises also received a fresh coat of ivy green paint.


I picked up a couple of cute outdoor pillows from Walmart for five bucks each.


This project's total breakdown...


Plus $10 for the new pillows for a complete cost of $55 before tax.
Not bad since it would have cost at least $70 just to replace the cushions!

Are they using the chaises now??? 
YES!!!


And it is two thumbs up from the peanut gallery!!!


Hope you are enjoying a glorious start to your summer!!!

XO
Sharing this post at link parties hosted by these wonderful blogs...

1/19/16

Kitchen Hutch in Her Winter Glory


Old man winter finally arrived and has been keeping us pretty dang cold up here in the northeast corridor. Temps for the week are predicted to be in the teens to low twenties at night, and maybe just getting up into the low to mid 30's during the day. We currently have about an 1/2 an inch of snow on the ground with a little more on tap for the rest of this week. With that being said it is certainly time to get cozy inside and settle into the winter. 

As you may remember, our kitchen now has a big beautiful hutch which I had painted black just before the holidays. She was a Restore score last spring for only $40. 

Here is her "Before" shot...


I had filled her with lots of white ironstone and pretty pops of red and green for the Christmas season. But now it is time to edit out the bright colors and give her a much less vibrant more serene look for winter.


I decided to switch out some of the plain white dishes with my black and white rooster dishes to create more visual interest.


The berry filled Christmas wreaths which hung from the black and white checked ribbon were replaced with simple winter green wreaths.


My pretty measuring spoons purchased in New Orleans a couple years ago remain hanging from the chicken wire door. (I think it is the perfect spot to display them)


A few items are added to the top of the hutch to give her a little more height.


Then the other day while in my local grocery store I was excited to find tulips in the floral section. Tulips are my absolute favorite flower and I just couldn't resist buying a bunch! They add a pretty touch of color to the kitchen island.


 So all in all I am absolutely thrilled with how my lovely hutch looks against the long wall in our kitchen. She has added tons of warmth and farmhouse charm to this rather large space. And moving some of my favorite seasonal things around her beautiful shelves has been a lot of fun as well. Ahhh to me she is a true stunner!


How about you? Have you done any post Christmas "Winter" decorating yet?

Wishing you a happy and warm week!
XO
Sharing this post at link parties hosted by these fabulous blogs...

8/19/15

Updating and Redecorating the Screened-In Patio


When we moved to 21 Rosemary Lane almost 13 years ago we were thrilled with the idea of having a large bug free enclosure off of the kitchen. But the patio itself was in need of a little, scratch that, a lot of TLC. 

Here is the Realtor's photo from 2002.


After four years of living with this rather blah looking space, in 2006 we began to work on freshening up the patio. The screens were somewhat compromised due to age but not so bad that we needed to remove them. So we painted. It had to be the hottest dang time of the year to attack this project as it was August and we wanted to have the painting done before Michael's 2nd birthday.

(Those are our two dogs at the time, Blizzard in the foreground and Sandy in the doorway. Both of them became doggy angels back in 2008.)


The finished space eventually looked like this.


Grace and Michael on the patio in 2008. 


And while I did like the space I had one ongoing problem. That being the dirt and mud tracked up onto the patio by kids, the dogs and yes, even Mr. Rosemary Lane. So to remedy the problem, in 2010 I repainted the floor, but this time I went much darker.


As you can see I changed up some of the furnishing with a few yard sale and roadside finds.


We only painted the floor this time although we could tell that the huge task of replacing the screens was going to be happening in the next few years.


And as predicted over the next five years the screens begun to seriously rip and disintegrate. So starting last month Mr. RL began the process of pulling off the exterior wood and removing the old torn screens.


Mr. RL also painted the ceiling in a pretty sky blue and then I repainted and caulked all of the interior white wood.


The floor also received a new coat of concrete paint. The color I decided on is similar to what I had used the first time I painted the floor. It is called Sandal and is part of Home Depot's DECKOVER floor paint collection. The floor will need one more coat before all is said and done. I decided it was OK to go back to the lighter color (of which I really preferred) because over the years we lost about 5 trees in the backyard, so the issue of dirt areas in the shade becoming muddy during rainy weather more or less went away.


And since we now have our big giant dog Buster who likes to create his own doggy doors to get on and off the patio, Mr. RL is going to build in an pretty architectural feature which will hopefully deter "The Bust" from using an unauthorized entrance onto the patio. (There will eventually be an "X" in each of the bottom sections.)


 I plan to re-configuring the furniture yet one more time. I would also like to incorporate a rectangular table for this space so it will seat six comfortably. I have an old farm table base in our basement but the top is way to big, so I'd like to make my own tabletop in a 3 ft by 6 ft dimension. The rectangular shape should better maximize the usage of the space on the patio.


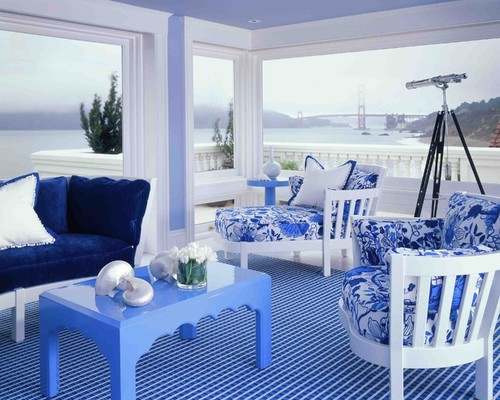
Now for the fun part, the decorating ideas! I think I am going to repaint both the natural color wicker love seat and coffee table in white. I love the crisp contrast of the dark blue with the white so this will probably be my jumping off point with regard to color scheme.

Here are some blue and white inspirational outdoor spaces I have come across.


source

source

source


pinterest


As you can see I am really digging the blue and white stripes. I truly hope to get this project as close as possible to finished by September 1st. 
Keeping "ma" fingers crossed!!!

And don't forget to stop tonight at 7 pm sharp for another Share Your Style link party! 
(Yours truly is hosting!)


XO

Disclaimer

All content provided on 21 Rosemary Lane blog is for informational purposes only. The owner of this blog makes no representations as to the accuracy or completeness of any information on this site or found by following any link on this site.

The owner of www.21rosemarylane.com will not be liable for any errors or omissions in this information nor for the availability of this information. The owner will not be liable for any losses, injuries, or damages from the display or use of this information.
These terms and conditions are subject to change at anytime with or without notice.

In addition products mentioned in some of my blog posts are done with the hope that i will render a good review on my blog. Products I review are ones that I have used personally and believe my readers will enjoy.
Copyright © 2014 21 Rosemary Lane. All rights reserved . Powered by Blogger.