
Hi Everyone...
and welcome to my second Photography Tip Thursday. Today I will be talking about digital camera basics.
and welcome to my second Photography Tip Thursday. Today I will be talking about digital camera basics.

First off you need to know the following...
Make sure you have the proper memory card for your camera. You can check your camera's manual for compatible memory cards. Also know where the card slips into your camera and how to put in and remove the card properly. Make sure your camera is off when you put in and remove the card as static from an "on" camera can damage your card. Store your card in a memory card case to protect it from damage.
Also make sure you have a freshly charged battery for your camera. Digital cameras will not work without a battery. Also know where the symbol is on your camera so you know how much charge is still left in the battery. (Check your camera's manual) Nothing is more frustrating than to loose power during the middle of your shoot.
Now your digital camera has three basic functions...
1. View Finder
2. Focus
3. Exposure modes
The View Finder
Most digital camera's these days have LCD screens and people have a tendency to use them as view finders. While this is good for framing shots and allowing more creativity when taking your photos...you must also remember that they are battery killers. So if you choose to use the LCD screen use it wisely.
Instead you can use the SLR (single lens reflux) or the traditional way of viewing your photo's subject. Although is is not a convenient as the LCD screen, you can take all the time you need in lining up you shots.
The Focus
You have the choice here to use an automatic focus or manual focus. Find the setting on your camera which allows you to switch back and forth from a manual setting to automatic. When you are in manual you need to use the focus ring located at the farthest part of your lens. Focusing a shot using your own eye is the best guarantee of a picture which is in focus.
The 3 Exposure Modes
Remember the old film cameras? Remember having to select the film with the proper speed for what you were shooting? Well you still need to do this when you are using a manual setting on your digital camera. This is called the ISO (International Standards Organization) and this determines how sensitive the image sensor is to light. Typical settings for the ISO are 100, 200,400 and 800. My camera is a Cannon Eos Rebel T3i and has the additional ISO settings of 1600, 3200 and 6400. The general rule of how the ISO settings work is the same as when we had to choose film speed back in the olden days. The lower the number the less sensitivity to light...the higher the number the more sensitivity. For example you can use an ISO of 100 or 200 when you are shooting outside on a bright sunny day. An ISO of 400 or 800 is what you need to use in a cloudy day or in the evening time. At night time you should use an ISO of 1600. Image quality is better with a lower ISO so try to choose the lower setting whenever possible.
The next mode is aperture. Simply stated it is the size of the opening in the lens when a picture is taken. When you press the shutter release button of your camera, a hole opens up allowing your camera's image sensor to catch a glimpse of the scene you’re wanting to capture. The aperture regulates the amount of light which reaches the lens. The larger the hole the more light that gets in – the smaller the hole the less light. Aperture settings are measured in F-stops. The tough thing to keep in mind is here is that there is an inverse relationship of the size of the opening to the number of the F-stop. So an F-stop of 2 is the largest possible opening and a F-stop of 22 is the smallest opening. As far as composition regarding F-stops...using the smaller aperture will result in a good or sharp depth of field. (Depth of field is how much of your photo will be in focus). If you are shooting a landscape, you may want the whole picture to be clear and sharp so you would use a smaller aperture. Using a larger aperture will create a shallow depth of field. Sometimes you want to blur out the background to emphasize your subject. in this case you would use a larger aperture. The best way to wrap your brain around aperture is to get your camera out and do some experimenting. Find a spot where you’ve got items close to you as well as far away and take a series of shots with different aperture settings from the smallest setting to the largest.


Shutter speed is the last mode I will talk about today. Basically it it the amount of time a shutter is open. When considering what shutter speed to use, you will need to think if there is any motion involved in the image you are trying to capture. If your subject is moving then you will need to decide if you want to freeze the movement or if you want to allow some blurring to occur. Shutter speed is measured in a second or fractions there of. The larger the denominator the faster the shutter speed.
1/1000 s
1/500 s
1/250 s
1/125 s
1/60 s
1/30 s
1/15 s
1/8 s
1/4 s
1/2 s
1 s

Shallow depth of field

Good or sharp depth of field.
Shutter speed is the last mode I will talk about today. Basically it it the amount of time a shutter is open. When considering what shutter speed to use, you will need to think if there is any motion involved in the image you are trying to capture. If your subject is moving then you will need to decide if you want to freeze the movement or if you want to allow some blurring to occur. Shutter speed is measured in a second or fractions there of. The larger the denominator the faster the shutter speed.
So if you want to freeze the movement like in the photo of the surfer below, then you will need a faster shutter speed.
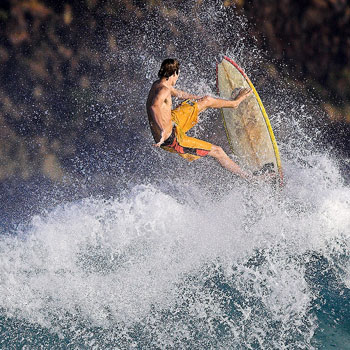 photo by konaboy
If you want the motion to be blurred you will need to use a slower shutter speed. When using a setting slower than 1/60th of a second to blur the movement, you will need to use a tripod.
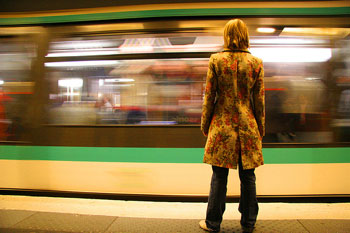
photo by flamed
Most importantly, changing any one of the exposure modes will impact the other two. This means that you always need to have the the 2nd and 3rd modes in the back of your mind.
Now go out and play with your cameras. That is actually my homework assignment for this week. The more you play with exposure settings the more comfortable you will become working with your camera.
Have a great week!
This post is linked to the following parties...
Now go out and play with your cameras. That is actually my homework assignment for this week. The more you play with exposure settings the more comfortable you will become working with your camera.
Have a great week!

This post is linked to the following parties...


This is awesome! I just got a new Canon T3 and I am trying to learn as much as I can. Thank you so much!
ReplyDelete~Trisha
I am hoping to purchase a better camera in a few months and then I will be coming back to study all of your helpful hints. Right now, it just seems Greek to me. I am a point and shoot girl but I would like to improve on that. Thanks for sharing on Becolorful.
ReplyDeletepam
Great information, I will be following you for upcoming Thursdays.
ReplyDelete